CICD Pipeline for multiple services on AWS ECS with ECS ComposeX
Introduction
A few days back, I published the first release of ECS ComposeX which allows developer teams working on AWS to deploy their microservices on ECS, using Fargate primarly to run these containers, and at the same time deploy the other resources they might need in order to run their microservices, such as AWS SQS queues, AWS RDS, AWS DynamoDB etc.
What this tool really aims to do is to merge the syntax of Docker Compose and AWS CFN into a common YAML Syntax, re-using the properties etc. of CFN but keeping it very light for developers, and provide all the application needs: IAM roles to communicate to AWS services, credentials to connect to the database, Service Discovery, etc.
And it is all good and well, but I thought it would be more relevant to show-case how to use that in the mix of a CICD pipeline.
So to do that, I am going to use very simple containers and applications which should be generic.
We are going to have:
- Front End container running a Flask application
Receives the API calls
Sends a message in SQS
Gets the time from another application
- Application to get the time
No load-balancer or else but registered in AWS CloudMap
FrontEnd app will get the time from there
For this we are going to use 1 SQS Queue for normal messaging, which is going to pass to DLQ. In a future blog post adding a new service, our worker will pull messages from the DLQ.
Note
I am afraid there won't be any screenshots to illustrate steps in this guide, but only command lines. The occasional screenshots will be to illustrate the different resources and results.
The CI/CD pipelines
Each of these two applications are going to use a generic CI pipeline, triggered in CodePipeline by a GIT activity. The build process will simply take the new code, run Docker build and upload the image into AWS ECR. As a last step once the image has been uploaded correctly into ECR, will pull out the latest Docker compose file and update the image property accordingly.
A separate CD Pipeline which listens on the change of the Docker compose file, will then kick off. In a CodeBuild step (could be in Lambda though), we are going to pull ECS ComposeX from Pypi, execute it against the Docker compose file and bundle the resulting template and parameters file.
These files will be then used by AWS CloudFormation to deploy a new stack (from scratch, with VPC etc.) to test the full deployment of all applications, with the new repository in place. Following that, we will run via CodeBuild a suite of tests against the endpoint (via the ALB) where the application stack has been deployed to ensure the functional behaviour of the apps.
The Pipeline will then continue into a manual approval notification to progress into deploying into an existing, pre-established environment. The only difference then, is that the VPC won't be changing. At that point, the name of the target stack is always the same and doesn't change.
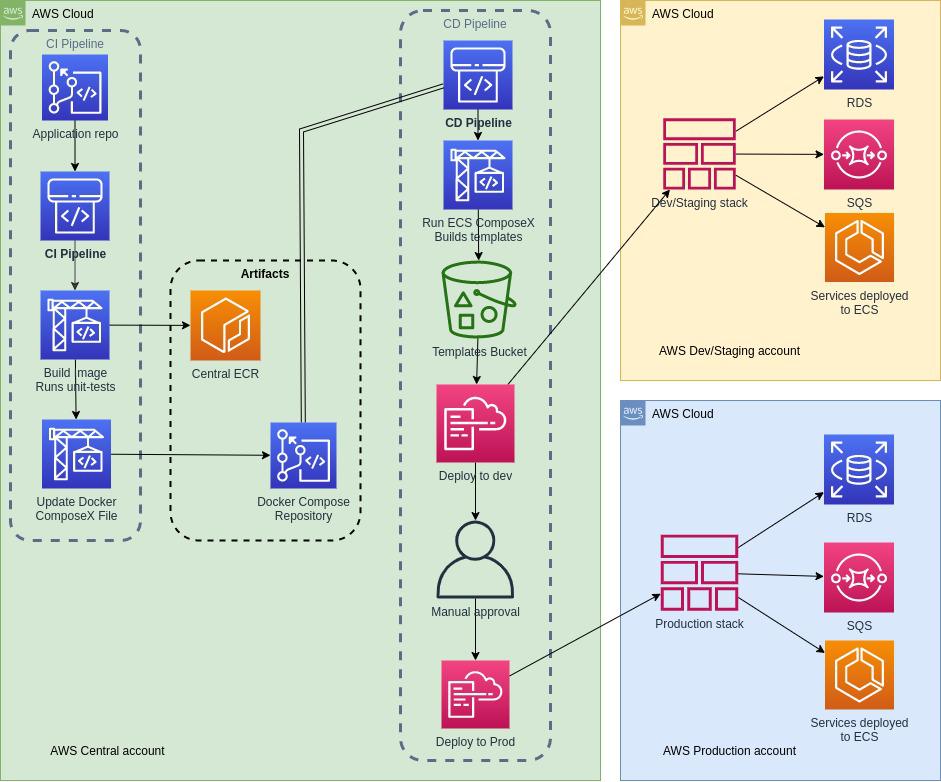
CICD structure
The below image illustrates how the CI pipeline connects to the CD pipeline and via which artifacts. Obviously, in the CD pipeline, one would also execute the application integration test-suite against the deployed environment.
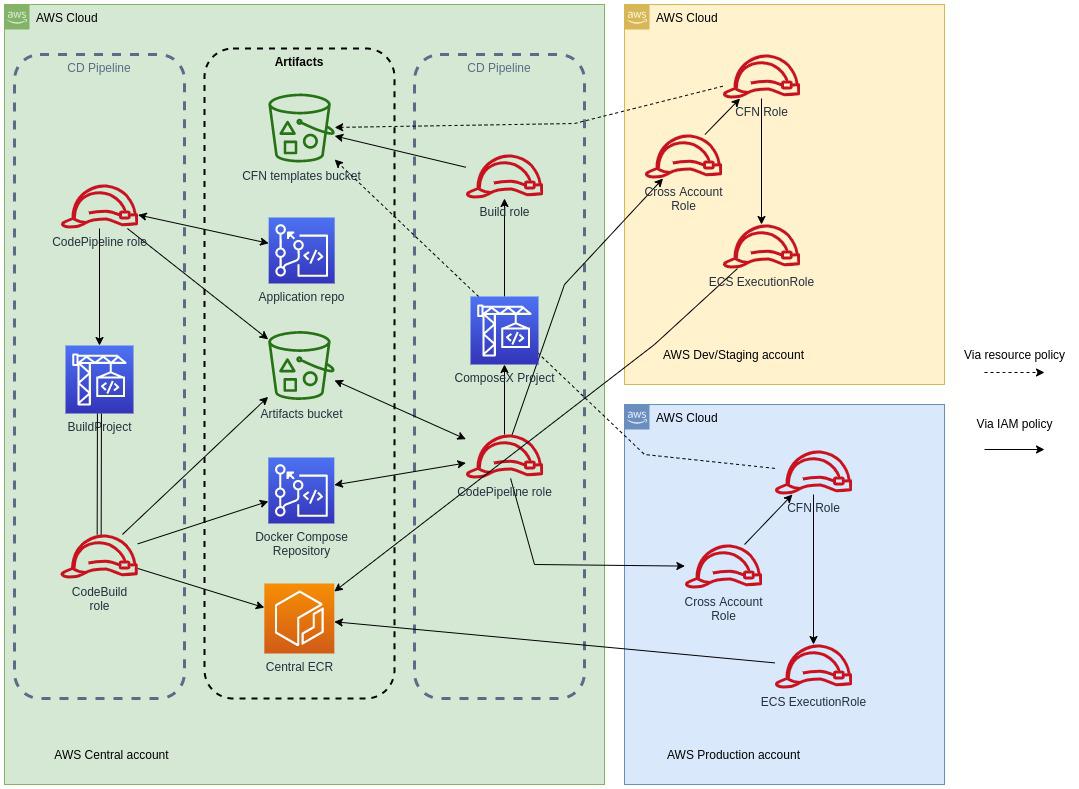
IAM Structure
The below image tries to illustrate as simply as possible the different relationship between artifacts and IAM roles. It doesn't go to the tiniest of detail but gives a good overview, especially for the cross-account structure, of the different IAM roles and access between these.
Source code
All the ECS ComposeX Repository is available in GitHub, as well as the other applications.
Hint
To make automation easier and hide away the account IDs in this tutorial, not that I care too much about it, but still, they will be placed in a static SSM parameter. Feel free to create these for yourself to follow / copy-paste the command lines.
Applications & Repositories
First, I recommend to use the excellent local tools to run AWS CodeBuild etc locally. You can find the instructions to run codebuild-like executions on this AWS Blog page. For each of these applications, we will have a different GIT repository. For the purpose of this example, I am going to have these in CodeCommit, but demonstrate in alternative templates how you could use GitHub instead. I love CodeCommit because it is integrated to IAM so super easy to share across the members of groups and roles etc.
App01 - FlaskApp
This application is dumb and purely stateless. It is going to respond with the date when you ping it. As we are going to build new versions we will be able to add more build tests to it. App01 will also communicate with App02 by API message to get the time (fancy, I know!)
App02 - The date teller
The 2nd application will run without any load-balancer, but our App01 will communicate with it to get the date purely using Service Discovery.
The Docker compose repo
We are going to have a separate Docker compose repository which is here to be updated by CodeBuild whenever a build of App01 or App02 is successful and results into a new images in ECR.
Cross-account roles
Cross account role
The cross account role allows the CodePipeline service to assume role into the destination account. Given iam:PassRole cannot be done cross account, this is how we get to run CloudFormation into the external account.
We want this role to be able to:
Decrypt objects with the KMS Key
Get objects from the artifacts bucket
Do everything for CloudFormation
Pass the CloudFormation role to CFN to create the stacks and resources.
CloudFormation role
As said above, iam:PassRole cannot pass role from one account to another. So once the assume role is done, we still want to pass role to not have this shared role which requires no MFA or external ID to have too many powers. Anyway, I generally prefer to give an IAM role to my CFN stacks anyway as soon as I delegate to a service to invoke CFN Create/Update/Delete.
Create the roles in your accounts
aws cloudformation --capabilities CAPABILITY_IAM                                \
    --stack-name cicd-iam-roles                                                 \
    --template-body file://crossaccount-roles.yml                               \
    --parameters                                                                \
        ParameterKey=CiAccountId,ParameterValue=<012345678912>                  \
        ParameterKey=CiKmsKeyId,ParameterValue=abcd1234-ab12-cd34-ef56-5678wxyz \
        ParameterKey=ArtifactsBucketName,ParameterValue=<BUCKET_NAME>           \
        ParameterKey=CloudformationTemplatesBucketName,ParameterValue=<BUCKET_NAME>
Orchestration
CI - Integration pipeline(s)
Now we have a clearer idea of what we need: we need a constant build project that is in charge of merging / updating the Docker compose file either when its own repository is updated, or, whenever a new image is successfully built.
So we are going to have two more CloudFormation templates for our CodePipelines and CodeBuild projects:
DockerCompose Build project, which does the same thing across all our applications: merge the docker compose files.
Applications codebuild to build the app, test it, build the docker image, test it, release it, and onto the Docker compose file merge and update.
Integration stages
Source from our Git repository
Run build tests and upload new image to ECR
Puts into artifacts the service, image SHA and other settings into a configuration file.
Pulls Docker composerx which merges the information from previous stage into the common docker compose file.
The application CI pipelines can be found here
To create the pipelines, I simply ran
for count in {01..02}; do aws cloudformation create-stack \
    --capabilities CAPABILITY_IAM \
    --template-body file://apps_pipeline.yml \
    --parameters file://app${count}-params.json \
    --stack-name app${count}-ci-pipeline;
done
Done that for all 2 applications. Obviously, we could have created the CodeBuild Projects just once and used it across multiple pipelines, but to keep things simple for this article, we get one build project per application. We would have to set variables overrides on the pipeline though.
Tip
In an environment with a lot of microservices, one might want to have a central build project for putting the Docker compose file together so that there is a natural queuing of changes happening in the repository for this.
Tip
Standardizing your application build and test framework (ie. use Pytest and tox for python, maven for Java) for all your services allows for you to have an unique buildspec.yml instead of having to customize each buildspec for each individual application build and test.
Note
We are using 2 (2 Apps * 2 Projects) to build our different artifacts. We could use only just two of them but then tasks would be queued. Also, note that having the build project but not using it to run build has no cost! You only pay for the build time :)
As you can see in the buildspec_composex.yml, we are pushing as CodeBuild user into the master branch. One might not want that but once again, for the purpose of demonstration, I am doing it that way. The great thing of using CodeBuild and Codecommit here is obviously that we gave specifically access to the CodeBuild role to push into that repository only.
{
"Version": "2012-10-17",
"Statement": [
    {
        "Action": [
            "codecommit:Git*"
        ],
        "Resource": "arn:aws:codecommit:eu-west-1:373709687836:myapps-compose",
        "Effect": "Allow",
        "Sid": "CodecommitAccessToDockerComposeRepo"
    },
    {
        "Action": [
            "codecommit:GitPull"
        ],
        "Resource": "arn:aws:codecommit:eu-west-1:373709687836:docker-composerx",
        "Effect": "Allow",
        "Sid": "CodecommitAccessToDockerComposerRepo"
    }
]}
With the AWS GIT Credentials helper enabled, here enabled in the env section of the buildspec.yml, it automatically allows IAM access to the repository.
So that is it for our Application build phase and Docker compose file update. Now onto the CD pipeline.
CD - Deployment pipeline
aws cloudformation create-stack --capabilities CAPABILITY_IAM \
    --stack-name myapps-cd-pipeline \
    --template-body file://cd_pipeline.yml \
    --parameters \
        ParameterKey=ComposeRepositoryName,ParameterValue=myapps-compose \
        ParameterKey=BranchName,ParameterValue=master \
        ParameterKey=ProdAccountPipelineRoleArn,ParameterValue=<ROLE_ARN>   \
        ParameterKey=ProdAccountCfnRoleArn,ParameterValue=<ROLE_ARN>    \
        ParameterKey=DevAccountCfnRoleArn,ParameterValue=<ROLE_ARN>     \
        ParameterKey=DevAccountPipelineRoleArn,ParameterValue=<ROLE_ARN>
Pipeline Source - Docker compose file
Our source trigger is going to be a change in the Docker compose file. For this, we could use multiple sources, for example: * AWS S3 : CodeBuild in our CI pipeline will store the artifact in S3 and we will use that as the source to run the build against * AWS CodeCommit: CodeBuild will update it from our CI stage. We have a repository setup for the Docker compose file specifically.
Whether the file is changed in S3 or in VCS, we might need to re-deploy / update our deployment / staging stack and onwards to production. There might not be application code changes, but we might have decided to change some settings which need to be reflected in our deployment.
Here, we are going to use CodeCommit as it is usually more consistent to use VCS as the source of truth, and allows a more consistent GitOps pipeline.
Templates generation stage
For this we are going to run CodeBuild again. We install ECS ComposeX and its dependencies, run it against our input docker compose file. This will generate our CFN templates and parameter files which are going to be used in the deploy phase.
First deployment - throw away environment
First off, we are going to deploy a complete new environment. This ensures the templates got created correctly, and our application containers can run properly. This is where onwards you might want to add a stage to perform integration testing against this environment.
Test phase
Our environment is ready and our applications are running. Especially in the case of public facing applications, with exposed interfaces to partners etc, this is where you take the testing up a notch with a fully fledged application testing against a running environment.
Using the outputs of the CloudFormation stack, we can identify our endpoints, and run tests against these.
Cleanup phase
Assuming that all went well with the testing, we are going to get CodePipeline to delete the stack. If the execution was failed for the testing, then everything is still running and you can look into the logs to figure out what's happening.
Deployment to production
Note
Before deploying into production, I created a VPC using ecs-composex-vpc. Production environments are usually built in different phases as opposed to all in one. Using the outputs values, I created the CFN Template configuration file
Of course, in many cases there are plenty of environments between dev and prod (UAT, SIT etc.). These environments often will have been created, and the values of interest (VPC ID, Subnets ID etc.) will be passed in as parameters.
To do that, we would pass a CloudFormation stack parameters file into CodePipeline, with the values of our VPC.
Given ECS ComposeX can skip the VPC and ECS Cluster creation part, it is very easy to simply pass these arguments to the root stack which will simply use the values and pass them on, dealing only with the X-resources and ECS services.
Before going to production, a lot of people want to have a manual approval. Often this takes days in large companies.
Conclusion
With a very simple pipeline taking care of the CI for our application and its packaging into ECR, with the help of a central repository for your application docker compose file and using ECS ComposeX, we were capable to deploy a brand new environment, from scratch, to deploy our application into and that we can use to run any automated tests planned for.
Using CodePipeline as the central orchestrator to deploy our stack into multiple accounts, we can very easily replicate these steps to multiple environments, across multiple accounts, and yet have very little to do.
Note
Not all of the applications might not have been completely finished at the time of writing this blog post. I wanted to focus as much as possible on the CICD part of things as opposed to the applications deployed themselves. It leaves room for a part 2 of this post.
Alternative pipelines
It is completely up to you and your business to decide how you are going to release your applications and therefore decide on what is going to trigger your deployments. Here in this example, I am considering any push on the master branch of my compose repository. You could have with your GIT strategy decided that only a new tag release can trigger a deployment to production and that other pushes, such as new branches etc. would trigger dev environments deployments / updates only.
Room for improvement
As for everything, there is always room for improvement. Please leave your comments and feel free to submit issues or even PRs against ECS ComposeX or this blog's repository for patches and improvements.
Because pipelines and the associated resources are not the most friendly things to generate, I will start working on a similar project than ECS ComposeX which for now is called Pipeline composer, pending a better name possibly.
Comments
Comments powered by Disqus