Automated ECR Scans & Reports with ecr-scan-reporter

Situation analysis

#TLDR; A lot of images built and used, no notifications, and no automated re-scan after X amount of time.

With the rapid adoption of containerized technologies, and the ease of use that allows anyone today to publish images for internal or public consumption, has grown the necessity to scan and inspect security of our images.

Although DockerHub and other Docker images repositories allow certain vendors to release official images, there is no doubt that unaware developers or cloud engineers would jump at the opportunity to grab the first image that does the job for them and move on.

But that is not the only issue at hand: with the adoption of DevOps lifecycles, a lot of repositories simply grow bigger by day, as the pipelines build new images everyday.

On AWS ECR, you can set to perform a scan of the image when pushed, but, not all OSes are supported yet for scanning, and, most importantly, there is no notification integration built-in to let the teams know the outcome of the scan with other services. Which could lead to vulnerabilities to be shipped into the newest version of your images. If you rely on humans to actively go and check for the scan result when you provided them with a pipeline that does everything else for them, chances are, they won't.

Furthermore, by having tens of new images a day published can lead to simply to loosing complete track of what is in your repository. So after even just a few days, these images you recently pushed could in fact contain vulnerabilities that on the day you scanned them, weren't in the CVE (or other security reports sources) at the time, and one of these images could very well be the one you have running in production.

Welcome ECR Scan Reporter

#TLDR; ECR Scan Reporter | Documentation

ECR Scan Reports being a built-in feature of AWS ECR, which is free, uses Clair, and publishes to EventsBridges events when scans are in progress, failed or complete, we have a very easy integration that allows us to capture and feed into AWS Lambda (or other services).

Also, EventsBridge allowing us to create cronjobs like executions (previously into AWS CloudWatch Events) we could trigger a scan for all the images of all our repositories on a regular basis to ensure that we keep up with the images we previously published.

ECR Scan Reporter aims to provide these features in cost effective way using AWS Lambda and fully automated, that users can configure as they need it.

Actively scanning regularly

https://ecr-scan-reporter.compose-x.io/_images/EcrScanReporterWorkflow.jpg

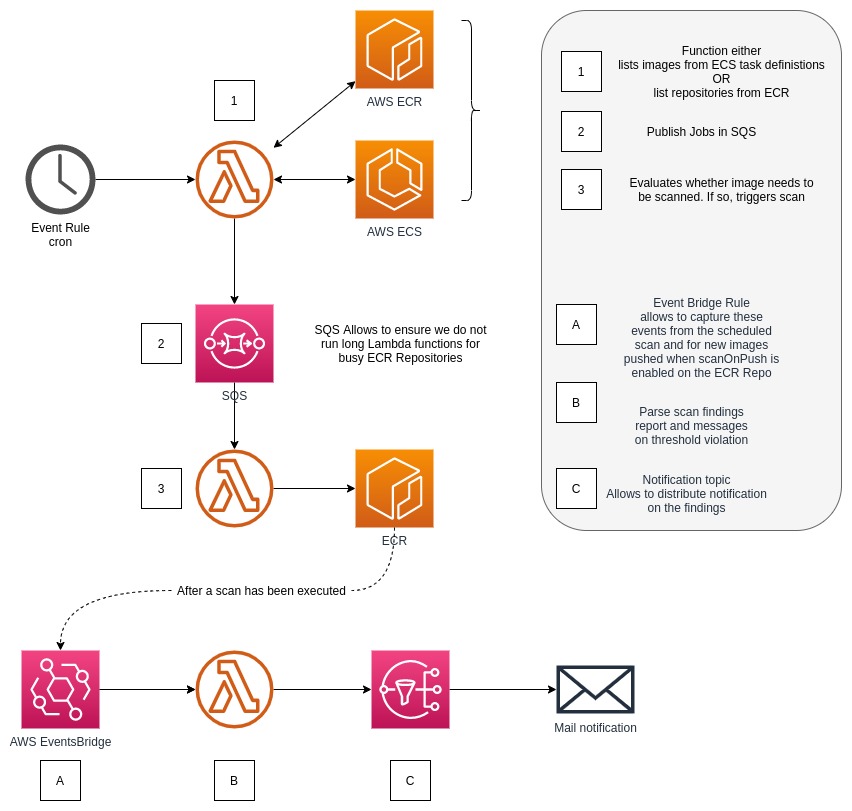
As described above, we then have 2 functions which work together. The first one, will list all the repositories in the Registry (note that these are region based), and then send into SQS a list of the repositories that you want to scan.

Hint

The Function that lists the repositories can be provided a regular expression to select which repositories to scan.

A second Lambda function, triggered by Lambda via SQS, receives the repositories to scan. The reason for splitting the two functions is to enable parallelism and keep the execution time of these lambda functions very short.

That second function is then going to list the images of the given repository, and describe these in order to get information details about the scan.

If the image was never scanned, it will trigger a scan. If the image was scanned, it will then evaluate how long ago was that last scan, and if above the user defined "expiry duration", will then trigger a new scan for that image.

Hint

The default duration is 7 days, and is completely configurable by the user.

Hint

For each vulnerability level (CRITICAL, HIGH, MEDIUM and LOW) the user can override the threshold value for the scan.

Note

Some repositories do not have immutable tagging, leading to some images being untagged, but still in the repository. ECR Scan Reporter will then fall back onto using the Image Digest instead of the image tag in subsequent API calls.

Reporting findings

As mentioned in the situation analysis, there is not (yet! ... AWS has a habit to make my solutions obsolete) a feature to integrate into notifications systems easily yet to report on the security findings once the scan is complete (or failed).

From SNS, one can do the integration to a number of target, or for integration that might require a little bit more involvement, trigger a similar lambda function to notify on findings.

Note

ECR Scan Reporter is written as a Python Library. The Lambda functions simply put the functions in the right order, but you could re-use the Lambda Layer / Python library in your own function and reuse these functions.

Future improvements

One thing that teams using ECR today can do is already to setup lifecycle policies to clean up images that match a number of criteria, which can remove a fair number of images "left behind" which will inevitably get security vulnerabilities reported and therefore create "noise" when the InfoSec teams try to triage and understand what is going on.

Where the implementation of the reporting function is very simple and basic, it would be very easy for anyone to adapt the functions into doing more.

Participate in the roadmap!

This is an open source project that we would love users to get involved, so please help making the reporter better and open new feature requests on GitHub.

Use your docker-compose files as a CloudFormation template

Introduction

AWS CloudFormation features has continuously grown up over the years, more recent features such as CloudFormation modules simply are rising the bar and providing so many more ways for Cloud Engineers to use this incredible service.

One of the features that was extremely popular (still is!) as it went out was the marriage of AWS CloudFormation and AWS Lambda into AWS Custom resources.

At the time, so many resource types might not be supported, of options missing out of CloudFormation, or Functions (maths or string transformations, loops etc.) which weren't native to CloudFormation abilities are now possible.

But then, with the rise of Serverless applications, AWS Created AWS CloudFormation Macros. The most famous of which, supported and published by AWS, is AWS::Serverless.

The idea is simple: create an object, give parameters and settings, get a Lambda function to render the appropriate resources such as Databases, S3 buckets, subnets etc, or far simpler things, such as string functions or maths, and inject it back to a "rendered" version of your original CloudFormation template.

Again, which AWS::Serverless, this is how one object, is, AWS::Serverless::Function, you can end up with the Function, its IAM role, permissions set, VPC configuration etc. etc.

That, is what ECS Compose-X macro is set out to do for you, but instead of using a CloudFormation template as the source, you can use your docker-compose files!

ECS Compose-X until now

Until now, you could use ECS Compose-X as a CLI tool on your laptop or in your CICD tool of choice, get your docker-compose files from GIT or otherwise, and transform your docker-compose file into a fully-fledge set of templates you could use directly with AWS CloudFormation.

This is what we have been doing in my current place of work, and it has been great. But with the number of teams growing, this means that they each have to track what the latest version of it is to fix bug or add new features support.

Introducing ECS Compose-X as a CloudFormation macro !

With the all recent AWS Lambda support for using Docker images as the source for a Lambda function, it will allow a number of people to very easily ship more involved and bundled up serverless applications, as well as vendors to offer applications that can run in AWS Lambda.

Hint

You should ALWAYS verify the source of a docker image before executing it. I know in 2021 we shall see some security breach out of developers running un-verified images in Lambda functions with administrator access....

So naturally, as I was in the process of publishing a docker image for ECS Compose-X on AWS Public ECR, I also added an image specifically to deploy the CloudFormation macro. But, then, AWS Lambda with Images only supports images coming from a private ECR Repository...

So here are the easy to deploy links for you to install the CFN macro into your account.

Region

Lambda Layer based Macro

us-east-1

LAYER_US_EAST_1

eu-west-1

LAYER_EU_WEST_1

Note

In the after maths of releasing this, I would recommend to go with the Layer version to allow you to perform any kind of audit you might want to activate any tracing that might be going on.

How to use the Macro ?

The title of this blog post is, use your docker-compose file as a CloudFormation template. And this is, in essence, the objective of ECS Compose-X and the macro.

There are two ways supported to do this: using the Docker compose directly or from a remote source (S3/HTTPS). So let's re-use our Wordpress example.

Note

The following examples require for you to have installed the CFN Macro.

Using a flat file as CFN template

When using your docker-compose file as a CFN template, there are a couple limitations to have in mind:

  • You cannot have multiple docker-compose files together (to use override). Therefore, you would need to have a single (potentially longer) docker-compose file.

  • After adding the transform section to the template, docker-compose locally will not work because Transform is not a valid docker-compose keyword.

As previously, I have two files:

  • docker-compose.yml -- which contains our services definitions. Here, we only have our wordpress service

  • aws.yml -- this is our template that sums up all the things Compose-X needs to handle for us in order to deploy the service successfully

So I am going to merge those too files together and add the following at the top (the position does not matter).

Then I add the following to the YAML file. At this point, when one gives that file to Cloudformation as a template, it will need to run the macro to get the rendered parts of the template.

Transform:
  - compose-x

And that is all you had to do. Now we have the "template" and the Macro, we can just create a new stack (or changeset) with AWS CloudFormation.

From the CLI

CAPABILITIES="APABILITY_AUTO_EXPAND CAPABILITY_IAM CAPABILITY_NAMED_IAM"
aws cloudformation create-stack --template-body file://merged.yml --capabilities ${CAPABILITIES} --stack-name wordpress-demo

And that's it. CloudFormation will invoke the CFN macro which will render for us all the templates we need, and return it back to AWS CloudFormation to then create all our resources.

Hint

If you have installed ECS Compose-X locally, you can merge the two files using

ecs-composex config -f docker-compose.yml -f aws.yml | tee merged.yml

Note

If you are using env_files in docker-compose, you can use that in ECS Compose-X via the CLI but you cannot use it via the CFN macro at this time.

Using files stored in AWS S3

---
# Wordpress demo using ComposeX Macro
Fn::Transform:
  Name: compose-x
  Parameters:
    ComposeFiles:
      - s3://files.compose-x.io/docker-compose.yml
      - s3://files.compose-x.io/aws.yml

Note

Just like with the CLI, the order in which the files are composed together (first file least priority, last highest priority) the order you list files in ComposeFiles matters in the same way.

Conclusion

Given where AWS Proton is going, I feel like this is a technique that deserves more awareness from people, as anyone today could simply write very light macros, using AWS CDK or Troposphere, or just very simple functions, and in fact do exactly what the Proton definition is shaping up to be. Only, doing it via AWS Lambda will allow you to solve far more complex logic than OpenAPI will ever let you.

Note

Proton offers other features though. Here I am focusing only on the rendering "aspect" that both solutions have.

On the field and our day-to-day lives, what this does help with is allowing developers to have a quick glance at CloudFormation, being able to see what the docker-compose file content is or what is the resulting version of these (stored in S3 or else).

As always, all the source code for everything is available on Github to provide you with the most visibility on what's happening with ECS Compose-X.

In the article we will see how to the CFN macro for multi-accounts deployments and how to take advantage of it for your CICD pipelines.

Hint

Soon will be published an simple web page listing the Lambda layer versions available for you to use and the git commit they relate to

Docker images multi-arch manifest build with AWS CodeBuild Batch

Prelude

A few months back AWS Codebuild release Batch builds. A very easy way to build multiple things at the same time, with or without dependencies or order between each other. Very convenient in order to avoid creating multiple projects, with different settings, simply define these settings directly in the buildspec.yml file.

Last year I read a blog post published by AWS, around docker images build for multiple architecture using AWS CodeBuild and AWS CodePipeline.

So this is a follow-up, in some regards, to that article, to further demonstrate AWS Codebuild capabilities.

In practice

It is very simple to get going with AWS CodeBuild batch, and it very well integrates into CICD Pipelines. Here what I had to do is simply have a specific buildspec definition file to distinguish building the docker images and one for building the manifest.

Let's go step by step on how I approached the implementation

Dockerfiles

At the start of the project I had only aimed to build for python3.7 images. But, I realized, why stop there. Given that some extra commands are necessary for installing python3.8 with Amazon Linux, I thought the easiest thing for all is just to have two different files.

But in essence, they are doing the same thing: update the packages installed, install python, set the new python as default.

Batch buildspec definition

AWS CodeBuild supports multiple configurations and is very versatile. Here we want to build 4 docker images, and gather these images in groups of two manifests. So, we are going to have one build per configuration and therefore one image per.

Each build will end by publishing the image build to AWS ECR, which our final stage will use.

Here with a batch-graph configuration, we can define dependencies between builds. So here, our manifest step will only be executed once the others are finished.

Note

You can define whether they all need to succeeed or not to progress.

batch:
  fast-fail: false
  build-graph:
    - identifier: amd64_py37
      env:
        compute-type: BUILD_GENERAL1_LARGE
        privileged-mode: true
        variables:
          VERSION: 3.7
          ARCH: amd64
      buildspec: build_images.yml

    - identifier: arm64v8_py37
      env:
        type: ARM_CONTAINER
        image: aws/codebuild/amazonlinux2-aarch64-standard:2.0
        compute-type: BUILD_GENERAL1_LARGE
        privileged-mode: true
        variables:
          ARCH: arm64v8
          VERSION: 3.7
      buildspec: build_images.yml

    - identifier: amd64_py38
      env:
        compute-type: BUILD_GENERAL1_LARGE
        privileged-mode: true
        variables:
          VERSION: 3.8
          ARCH: amd64
      buildspec: build_images.yml

    - identifier: arm64v8_py38
      env:
        type: ARM_CONTAINER
        image: aws/codebuild/amazonlinux2-aarch64-standard:2.0
        compute-type: BUILD_GENERAL1_LARGE
        privileged-mode: true
        variables:
          ARCH: arm64v8
          VERSION: 3.8
      buildspec: build_images.yml

    - identifier: manifest
      env:
        compute-type: BUILD_GENERAL1_LARGE
        privileged-mode: true
      depend-on:
        - amd64_py37
        - arm64v8_py37
        - amd64_py38
        - arm64v8_py38

Hint

All the buildspec batch specifications are available here.

Once the build has finished, if succeeded, you should see

AWS Codebuild - Batch summary

And that is it, this is really that simple.

Possible improvements

Here I use the same image base for both python 3.7 and 3.8. So instead of doing 1 build for each, I could have simply build both images in 1 go per architecture. But for the purpose of this example, it seemed clearer that way to demonstrate the potential of AWS Codebuild for your multi-arch and multi-os builds.

Conclusion

AWS CodeBuild is growing with more and more features, and this is one that would allow a number of developers out there to very easily be able to build and publish packages for multiple OSes and CPU architectures.

Sources

You can find the source files for this project in GitHub

Wordpress CMS from docker-compose to AWS in a few steps

Prelude

For many many years now, people have been using and modifying CMS such as Wordpress, Joomla, Magento to make it one of their own. Over the years, they have improved dramatically to allow companies to rely on them, being so easy for anyone non-technical to publish content on their websites.

So today we take one of the most popular(if not the most popular), Wordpress, and we are going to see how in a few steps we can get started with getting it up and running in AWS ECS, using AWS RDS for database, a Load-balancer etc. to get ourselves started.

Wordpress docker images from AWS Public ECR

First off, we want to use a well known publisher of a docker image to use for our application deployment. Since the recent release of AWS Public ECR, Bitnami, a well respected company over the years, has published their own images up there and also provide us with the docker-compose file to get up and running.

For more information on that, head of to Bitnami wordpress ECR page.

Docker-Compose file

The original docker-compose file that we are provided shows us, along with the documentation on the Github pages, what this Docker image is expecting/accepting as parameters to get the application bootstrapped.

By default, this docker-compose for local usage is going to create for us a MariaDB database to store our information. This is setting up some data and access, which we will modify to plug into RDS.

On the application side, we are going to remove a number of environment variables which will be published to the container from the x-rds definition.

Adapting the docker-compose for ECS ComposeX

When one runs docker-compose up, the environment is usually all layed out for us by docker-compose. No network management necessary (although recommended to create separate docker networks for logical placement). Also, the database comes as a docker container itself, so very little to do and we want to keep that simplicity.

Define local environment

So first of all, we are going to rename our docker-compose.yml file local.yml

Hint

docker-compose allows you to specify files you want to use. From the first file argument to the last specified, settings such as environment variables either merge or add up. This makes it very easy for us to have different configuration for different environments.

In this file we mostly want to keep the mariaDB section in order to test our changes, if any, to the main wordpress docker image.

version: '3.8'
services:
  mariadb:
    image: 'docker.io/bitnami/mariadb:10.3-debian-10'
    volumes:
      - 'mariadb_data:/bitnami/mariadb'
    environment:
      - MARIADB_USER=bn_wordpress
      - MARIADB_DATABASE=bitnami_wordpress
      - ALLOW_EMPTY_PASSWORD=yes

  wordpress:
    depends_on:
      - mariadb
    environment:
      - MARIADB_HOST=mariadb
      - MARIADB_PORT_NUMBER=3306
      - WORDPRESS_DATABASE_USER=bn_wordpress
      - WORDPRESS_DATABASE_NAME=bitnami_wordpress
      - ALLOW_EMPTY_PASSWORD=yes

As a result in our docker-compose.yml file, we now have

version: '3.8'

services:
  wordpress:
    image: public.ecr.aws/bitnami/wordpress:5-debian-10
    ports:
      - '8080:8080'
      - '8443:8443'
    volumes:
      - 'wordpress_data:/bitnami/wordpress'
    environment:
      WORDPRESS_SKIP_INSTALL: "yes"
    deploy:
      resources:
       reservations:
         cpus: 1.0
         memory: 1G

volumes:
  wordpress_data:
    driver: local

Note

By default, ECS ComposeX will use the smallest Fargate profile (.25 CPUs and .5G RAM). So using deploy as per the compose reference, we are assigning some more CPU and RAM to our container.

To run our wordpress locally we now would simply run

# Verify the configuration of merged files
docker-compose -f docker-compose.yml -f local.yml config
# Deploy continers from the composed set of files
docker-compose -f docker-compose.yml -f local.yml up

Create our AWS Environment definition

This section might seem long, but it only seems so due to a lot of explanations. You might copy-paste and adapt the code-block sections and add these to your aws.yml file.

Networking layout

In AWS you will need networking sorted out, using AWS VPC. If you do not already have a VPC created for you, you can let ECS ComposeX create one for you, it will do all the necessary.

In our case today, we are going to use an existing VPC. This was created before using a similar template as the one created by ComposeX, but you use your own, created manually or otherwise through IaC. All we need is to identify our subnets we are going to deploy to.

ECS ComposeX expects at least three categories of subnets: Public, Storage and Applications.

That said, you could arrange it to place everything together. The most important thing is to make sure you are placing your applications the most securely and, from a pure network point of view, we want to make sure that the Public subnets allow for traffic inbound / outbound through an Internet Gateway.

So this is how we tell ECS ComposeX how to find our VPC and Subnets:

x-vpc:
  Lookup:
    VpcId:
      Tags:
        - Name: dev-vpc
    AppSubnets:
      Tags:
        - vpc::usage: application
        - aws:cloudformation:stack-name: dev-vpc
    PublicSubnets:
      Tags:
        - vpc::usage: public
        - aws:cloudformation:stack-name: dev-vpc
    StorageSubnets:
      Tags:
        - vpc::usage: storage
        - aws:cloudformation:stack-name: dev-vpc

Now that we have that information, we write the above into a new file, calling it aws.yml as this refers to our AWS environment for this application.

Hint

If you already know your VPC ID and Subnet IDs, you can set these via IDs using Use instead of Lookup. See ECS ComposeX x-vpc syntax reference

Hint

Refer to your network team in case you have a more complex setup.

Ingress using an Application Load-Balancer

To anticipate for a number of things we want in order to make our site highly-available and secure, we are going to have an Application LoadBalancer. Over time, we will update this section of the aws.yml file.

We start with a very basic and open configuration:

x-elbv2:
  lbA:
    Properties:
      Scheme: internet-facing
      Type: application
    Listeners:
      - Port: 80
        Protocol: HTTP
        Targets:
          - name: wordpress:wordpress
            access: /
    Services:
      - name: wordpress:wordpress
        port: 8080
        protocol: HTTP
        healthcheck: 8080:HTTP:/:7:2:15:5

Hint

Refer to ECS ComposeX x-elbv2 syntax reference for a lot more details on this configuration

Database and storage

Finally, we want to use AWS RDS to store our data and for persistence of files, use AWS S3 to store our blog media content. Now, I am no expert at WordPress, but there are a lot of ways to achieve this so, from googling around I will be using a popular plugin that handles all that for you.

First of all, we need to define our database. AWS RDS is super powerful and we only just need a MySQL DB. At this point, you could just use AWS RDS with MariaDB engine, AWS RDS with MySQL Engine or AWS Aurora with MySQL Engine compatibility.

Truly this is a choice to make on your own. Today to prove further compatibility, I am going to use AWS Aurora with MySQL.

x-rds:
  wordpress-db:
    Properties:
      Engine: "aurora-mysql"
      EngineVersion: "5.7"
      BackupRetentionPeriod: 1
      DatabaseName: wordpress
      StorageEncrypted: True
      Tags:
        - Key: Name
          Value: "wordpress DB"
    Services:
      - name: wordpress
        access: RW
        SecretsMappings:
          Mappings:
            host: MARIADB_HOST
            port: MARIADB_PORT_NUMBER
            username: WORDPRESS_DATABASE_USER
            password: WORDPRESS_DATABASE_PASSWORD
            dbname: WORDPRESS_DATABASE_NAME

In ECS ComposeX the best practice for passwords is, no human shall know what the password is. Only we need to use it. Here given we use a pre-build docker image that is well documented, we know that wordpress is going to start and expect to find some settings to connect to the databse.

Given that AWS RDS and AWS Secrets Manager marry very well, we can use well-know secret structure to expose it to the application. That is what the SecretsMappings do for us here. ECS ComposeX will automatically know how to connect in AWS CloudFormation, our secret, the keys and grant our wordpress service access to it.

Hint

ECS ComposeX x-rds syntax reference for more details on that module.

Now that we have the DB sorted, let's look at the persistent storage via AWS S3. Below is a rather lenghty definition of our S3 bucket, using the same syntax as one would already do in AWS CloudFormation templates. That is one of the keystone of ECS ComposeX: keep AWS CloudFormation compatibility.

Here, we are going to let CloudFormation decide of the bucket name for us and will get it from our outputs.

x-s3:
  wp-data-bucket:
    Properties:
      AccessControl: BucketOwnerFullControl
      ObjectLockEnabled: True
      PublicAccessBlockConfiguration:
          BlockPublicAcls: True
          BlockPublicPolicy: True
          IgnorePublicAcls: True
          RestrictPublicBuckets: False
      AccelerateConfiguration:
        AccelerationStatus: Suspended
      BucketEncryption:
        ServerSideEncryptionConfiguration:
          - ServerSideEncryptionByDefault:
              SSEAlgorithm: AES256
    Services:
      - name: wordpress
        access:
          Bucket: ListOnly
          Objects: RW

Now at this point, you can use the following commands to merge all definitions together and see what an "all-in-one" docker-compose definition would look like.

docker-compose -f docker-compose.yml -f aws.yml config
ecs-composex config -f docker-compose.yml -f aws.yml

Note

Tried to keep the config rendering of ECS composeX as close as possible to what docker-compose would render in order to detect any differences in the services. However, docker-compose ignores all top keys starting with x- so you won't be able to see the rds/s3 etc. definitions.

Interlude

Now let's take a small break and deploy everything as-is. Yes, it is not perfect, especially areas around security access to the application. But, that's on purpose, in order to demonstrate how you can do some quick PoC work with ComposeX and take it up a notch once you figured out configuration and other settings.

# To make it easy for you and not configure all options, you can start by setting your AWS account up by running
# the following command. It will set the AWS ECS settings accordingly and create a S3 bucket to store our templates.
ecs-composex init
# Optionally, create a folderto output your templates locally. Otherwise, they always will be a copy in /tmp
# mkdir outputs
# Now at the ready to deploy! (Add -d outputs to place the files in the outputs folder).
ecs-composex up -f docker-compose.yml -f aws.yml --format yaml -n wordpress-demo

Hint

If you wanted to check on the templates prior to deploying, you can use either create or render instead of up. Render will only happen locally, Create will render the files and upload them to S3.

Now take a seat back and relax, it will take a little moment for AWS to create everything for us.

After a while, all should be deployed successfully, we have an application up and running in AWS ECS from that docker image, we could see from the ECS Logs that our wordpress has started etc.

In AWS CloudWatch you should be able to find your log group for wordpress and observe logs such as

2021-01-07T08:55:14.242+00:00        Welcome to the Bitnami wordpress container
2021-01-07T08:55:14.242+00:00        Subscribe to project updates by watching https://github.com/bitnami/bitnami-docker-wordpress
2021-01-07T08:55:14.242+00:00        Submit issues and feature requests at https://github.com/bitnami/bitnami-docker-wordpress/issues
2021-01-07T08:55:25.033+00:00        nami INFO Initializing apache
2021-01-07T08:55:25.237+00:00        nami INFO apache successfully initialized
2021-01-07T08:55:36.221+00:00        nami INFO Initializing mysql-client
2021-01-07T08:55:36.334+00:00        nami INFO mysql-client successfully initialized
2021-01-07T08:55:50.538+00:00        nami INFO Initializing wordpress
2021-01-07T08:55:51.018+00:00        wordpre INFO ==> Preparing Varnish environment
2021-01-07T08:55:51.019+00:00        wordpre INFO ==> Preparing Apache environment
2021-01-07T08:55:51.119+00:00        wordpre INFO ==> Preparing PHP environment
2021-01-07T08:55:51.143+00:00        mysql-c INFO Trying to connect to MySQL server
2021-01-07T08:55:51.297+00:00        mysql-c INFO Found MySQL server listening at wordpress-demo-rds-4tjz6cvkslbz-wordp-wordpressdb-174xmm2y7lwwo.cluster-cvjpaxz5wqkd.eu-west-1.rds.amazonaws.com:3306
2021-01-07T08:55:51.319+00:00        mysql-c INFO MySQL server listening and working at wordpress-demo-rds-4tjz6cvkslbz-wordp-wordpressdb-174xmm2y7lwwo.cluster-cvjpaxz5wqkd.eu-west-1.rds.amazonaws.com:3306
2021-01-07T08:55:51.319+00:00        wordpre INFO Preparing WordPress environment

Do more with ECS ComposeX

We know our application is up and running but currently you might be thinking that this is not particularly secure and the LB URL is simply not user friendly.

So let's add some security and DNS configuration to point to our Wordpress.

Setup a friendly DNS Name and a SSL certificate

Warning

ECS ComposeX was built for AWS specifically so at the moment, no other DNS provider than AWS Route53 is supported.

I have a DNS domain which I already have in Route53, so I am going to simply point to it.

x-dns:
  PublicZone:
    Use: ZABCDEFGHIS0123 # Redacted for privacy purposes.
  Records:
    - Properties:
        Name: wordpress.demos.lambda-my-aws.io
        Type: A
      Target: x-elbv2::wordpress-lb

Then we can now create a new ACM Certificate

x-acm:
  wordpress-demo:
    Properties:
      DomainName: wordpress.demos.lambda-my-aws.io
      DomainValidationOptions:
        - HostedZoneId: ZABCDEFGHIS0123 # Redacted for privacy purposes
          DomainName: wordpress.demos.lambda-my-aws.io
      ValidationMethod: DNS

Now we assign this certificate to our existing ALB, simply by editing our Listeners section.

x-elbv2:
  lbA:
    Properties:
      Scheme: internet-facing
      Type: application
    MacroParameters:
      Ingress:
        ExtSources:
          - IPv4: 0.0.0.0/0
            Description: "ANY"
    Listeners:
      - Port: 80
        Protocol: HTTP
        DefaultActions:
          - Redirect: HTTP_TO_HTTPS
      - Port: 443
        Protocol: HTTPS
        Certificates:
          - x-acm: wordpress-demo
        Targets:
          - name: wordpress:wordpress
            access: /
    Services:
      - name: wordpress:wordpress
        port: 8080
        protocol: HTTP
        healthcheck: 8080:HTTP:/:7:2:15:5

We can simply update our existing stack to add our new ACM certificate and DNS names pointing to our ALB.

ecs-composex up -f docker-compose.yml -f aws.yml --format yaml -n wordpress-demo

This update will be rather quick, and thanks to the instruction Redirect: HTTP_TO_HTTPS in our HTTP listener, all requests submitted over HTTP will be redirected to HTTPs. Using an AWS ACM certificate, our clients to the Load-Balancer will be able to get SSL information and match that against our site.

Once this is all done, setup your Wordpress user etc, install the Media Lite plugin, configure it for S3, and you can now use the S3 bucket as storage for your media files.

Here is a little gallery to help you go through the same steps as I did to get Wordpress + S3 working.

Conclusion

It might seem like a lot of work done to add an ALB, a certificate, a database, and point our site to the right VPC and subnets. But, in fact, this might have taken you a few minutes to copy-paste, change some values to your liking or find out what your DNS Public Zone ID that you can use, but once you have done that, you have nothing else to do.

ECS ComposeX does nothing magic post generating the CloudFormation templates. You can use and modify these templates manually down the road to adapt it to your objectives.

What ECS ComposeX will do for you is handle Security Groups opening, IAM permissions, and validate a number of things, with providing you the ability to change only very little number of things from your original docker compose file.

Here we split into multiple files only to represent multiple environments.

All the files used for this blog article can be found here

What is next ?

At the time of writing this blog post, Troposphere 2.6.4 is pending release to integrate EFS for ECS. This would be the last part of the puzzle to allow some settings to be persistent as they do not live in the database.

Also with the release announcement of AWS Proton, ECS ComposeX will focus on allowing existing Docker-compose users to define environments by using docker-compose syntax and help with the adoption of AWS ECS to run and deploy containerized applications.

From mono-repo to multi-services deployment with AWS CodeBuild and AWS Codepipeline

Introduction

As a follow-up to our previous blog article on CICD done at the time of the very first release of ECS ComposeX. This time, instead of taking a hypothetical use-case (although very common) we are going to explore a use-case I faced recently.

Developers have started a new repository and because of shared librairies or packages, custom made (and not published to AWS CodeArtifact for example) we have a Git repository that grew with many separate folders, each containing a specific service definition.

Sometimes, one can build a unique docker-image and pass it a different command, which is very versatile, and works well for applications in Python for example. However, other languages such as Java will require to build .jar files and such.

But then, that might be a lot of time spent building, especially if we build each image sequentially as for example, docker-compose would do.

Initial thoughts

As you might know, AWS CodeBuild has recently added support for batch builds: from your primary buildspec.yml file you define phases etc. as usual, but then define multiple builds that will be triggered at the same time, in many possible combinations.

After reading the documentation and the syntax, I could however not find how, for example in a build-graph, fetch the artifact produced from a previous build into another.

After trying a few things, using cache or otherwise, I figured that I could access each previous artifact into the next one, in the same way as you would using AWS Codepipeline secondary inputs.

Putting it together

In this example, we have 2 JAVA Spring applications. I never wrote JAVA applications, I only re-used scaffolds from projects. So these really do not do much at all, but they will serve our purpose : we will use maven to build our applications JARs, which we then put into a docker image, using amazoncorretto SDK (11).

Hint

These apps code is identical for the purpose of this blog post, but you could make them be whatever you want.

Workflow

A good picture is worth 1000 words they say, so here to illustrate the workflow that AWS Codebuild will follow based on our buildspec.yml file:

../../images/codebuild-batch-01/codebuild-workflow.jpg

You can find the full buildspec.yml file here

The most import parts of the buildspec.yml is the build_identifier in the build-graph section for each. When codebuild is done with the two previous artifacts, these will be passed onto the next phase.

In the buildspec_java_apps.yml however, we name the artifacts with the same name as the service, but the name of the identifier is what matters most.

Hint

It is tempting to use app_01 instead of app01 given the service name is app-01, but, from testing it around, this will make your life easier. Also, this allows the bash script to work to find the jars.

Builds of app01 and app02

As you can see in the buildspec.yml we have defined two builds which our composex phase will have to wait for completion before moving on.

Here given we have only java applications, we can re-use the same buildspec_java_apps.yml file to build our jar files. If we wanted to do something different for one or the other, simply create a new file for it and change the override.

ComposeX phases

Once app01 and app02 are complete, AWS Codebuild will kick off the composex phase. This does not have a buildspec.yml override so it will use the default one, but given the batch was already evaluated at the start, it won't be evaluated a second time around, and codebuild moves onto the phases of that buildspec.yml file.

Because we defined artifacts to gather in the previous stage, AWS Codebuild does something very sweet for us, but as far as reading docs and references, is not (as I write this article) documented.

Multi-Inputs build

For those of you used to AWS Codepipeline and AWS Codebuild, you will be familiar with how AWS Codebuild has environment variables CODEBUILD_SRC_{something} which refer to the build artifacts, and more specifically, to the secondary artifacts.

Here, AWS CodeBuild very smartly simply re-used the same principle.

So if we have a build-graph with identifier app01 we end up with CODEBUILD_SRC_app01_AppDefinition (AppDefinition because it is the way it is defined in AWS Codepipeline!).

Now we know that, and given we followed a specific naming convention for our identifiers to match our services names defined in docker-compose files, we can safely gather the outputs as needed.

Here, we only need the JAR files created by maven, and given we have a specific folder for each service source code, we place that JAR file into the folder.

for service in `docker-compose config --services 2>/dev/null`; do
      shortname=`echo $service | sed s'/[^a-zA-Z0-9]//g'`
      dir_env_name="CODEBUILD_SRC_DIR_${shortname}_AppDefinition"
      if ! [ -d ${!dir_env_name} ]; then echo "No output found for $service"; echo ${!dir_env_name}; exit 1 ; fi
      find ${!dir_env_name} -type f -name "${service}*.jar" | ( read path; cp $path ${service}/app.jar ) ;
done

Note

I chose to name the file app.jar when retrieving it from the previous build artifacts. If you modify your pom.xml to match your service name then that makes it even easier on you.

Bundle, publish, deploy

And this is where docker-compose and ComposeX really save us a lot of time and trouble. First off, with docker-compose, we now just build the services images and push them to AWS ECR.

docker-compose build
docker-compose push

Hint

Here we use the same base-image for each docker-image we build, so we do it in the composex phase to save time, but you could do the docker image build and publish for each service in their own "forked" build.

Once that is done, we can now use ComposeX to generate our CFN templates and configuration files. We place them into a new artifact which the pipeline will then use.

Back to CodePipeline

Worth pointing out, and I am yet to figure out the differences we might expect between build with batch-graph/matrix/list when it comes to the artifacts, and how they are merged if you so wish to do so.

In this use-case, I am merging the artifacts together.

Indeed, I do not need the JAR. files in the rest of the process, but, for those of you who might want to add some lambda functions in this repository and deploy these to layer or functions, there you go, you already have that JAR file ready in your artifacts!

CodePipeline expects cloudformation template and the config file. Given we bundled things together, CodeBuild has created sub directories for each artifact, named based on the identifier.

We then just have to adapt our path in the CloudFormation action of the Codepipeline stage:

- Name: !Sub 'DeployToDev'
  Actions:
    - Name: CfnDeployToDev
      ActionTypeId:
        Category: Deploy
        Owner: AWS
        Provider: CloudFormation
        Version: '1'
      Configuration:
        ActionMode: CREATE_UPDATE
        RoleArn: !ImportValue 'CICD::nonprod::Cfn::Role::Arn'
        StackName: !Sub '${DeploymentName}-dev'
        TemplatePath: !Sub 'AppDefinition::composex/AppDefinition/dev/${DeploymentName}.yaml'
        OutputFileName: outputs.json
        TemplateConfiguration: !Sub 'AppDefinition::composex/AppDefinition/dev/${DeploymentName}.config.json'
        Capabilities: 'CAPABILITY_AUTO_EXPAND,CAPABILITY_IAM'
      InputArtifacts:
        - Name: AppDefinition
      OutputArtifacts:
        - Name: DevStackOutputs
      RunOrder: '1'
      RoleArn: !ImportValue 'CICD::nonprod::Pipeline::Role::Arn'

Conclusion

We now can build multiple microservices artifacts / docker images, in parallel, and regroup the outputs of each for our next stages in codebuild itself and later in codepipeline!

For some of the teams I work with, this is a drastic time saving and boosts efficiency as builds take way shorter amount of time.

I hope this has been helpful in your journey to use AWS Codebuild and AWS Codepipeline, and deploy your applications via ECS ComposeX in the mix of things!

Some thoughts before you leave

  • You could have a repository with your docker compose files etc. and have a repository per microservice instead of a mono repo

    and still achieve the same thing, for example, using git submodules

  • If you have shared libraries you want to build first, simply add builds, publish to AWS CodeArtifact / Nexus / else

    then resume the build of your applications

Using ComposeX to deploy Confluent Kafka components

Introduction

Recently started to use Apache Kafka as our messaging backbone. For those of you know me, I would probably have gone the AWS Kinesis and otherwise way, but this was a decision I did not own. We started using Confluent Kafka via AWS PrivateLink, which however convenient, meant we could not have some features available.

Mostly, for our developers, this meant, no Control Center and no Connect Cluster.

Confluent has done an incredible job at putting together docker images and docker-compose files which allow people to do local development and evaluations of their services. So, as you guessed it already, it made for a perfect candidate for ECS ComposeX to take on and deploy.

The focus

The focus here is on how we took the docker images published by Confluent themselves, added our own grain of salt to work with ECS and then deploy with ECS Composex. We are going to focus mainly on Confluent Control Center (CCC) and the Connect Cluster.

Implementation

Hint

TLDR; You can find all the docker related files and examples here

Secrets & ACLs

Least privileges is one of my most important must-have in technical evaluations. AWS IAM is, in my opinion, the most comprehensive system I have seen to date. So putting anything against that often makes me perplex, as things usually do not support RBAC too well.

So, I was very happy to see that Kafka supports ACLs on topics and consumer groups, and cluster level. I was very happy to see that the connect cluster can use 3 different service accounts to manage separately the connect cluster itself, and then use different one for the producers and for the consumers. I was outraged to see that Control Center must have Admin level of access to the kafka cluster. There is no way to limit what people can do with it.

I was very disappointed that equally, the Confluent "Cloud" service registry does not have any notion of ACLs, but I am told by Confluent this is coming.

Note

Since then, AWS has released their AWS Glue Schema Registry, and will definitely get it a spin!

So, I create one service account for the connect cluster, and decided it was good enough for now to use the same service-account for all three parts (control, producer, consumer).

ccloud service-account create --description connect-cluster
# We retrieve and keep preciously these credentials.
ccloud api-key create --resource cluster-abcd --service-account 123456
# Now allow some access. That is up to you, keeping it rather open for the blog copy-paste.
for access in READ WRITE DESCRIBE; do ccloud kafka acl create --allow --service-account 123456 --operation $access --prefix --topic * ; done
for access in READ WRITE DESCRIBE; do ccloud kafka acl create --allow --service-account 123456 --operation $access --prefix --consumer-group * ; done

Hint

Refer to Confluent CLI docs for CLI usage and general ACL settings. This blog does not aim to cover best practices. Obviously, following least privileges access is best!

Now, we have credentials. So let's use AWS Secrets manager, given ECS integrates very well with it. For that we have two different CFN templates which create the secret for the connect cluster and one for the control center.

Note

The structure of the secrets is different from Control Center to Connect, so make sure you took note of which is which.

Note

No, I do not use Vault or anything else. AWS Secrets Manager does the job these templates will eventually contain the Lambda for rotation. Now that AWS MSK supports SASL and Secrets Manager integration, the plan is to simulate the same here.

Now we have dealt with authorization and authentication, we can move to the easy part. Really, the above was the difficult part.

Build the Docker images

We have the docker images build and published by Confluent, which is a somewhat difficult to follow build process, so not going to rebuild these. But we are going to use them as source to add a few bash scripts in order to deal with the keys of the secret to be individually exposed.

These are then pushed into ECR.

if [ -z ${AWS_ACCOUNT_ID+x} ]; then export AWS_ACCOUNT_ID=`(aws sts get-caller-identity | jq -r .Account)`; fi
docker-compose build
docker-compose push

start.sh

You will have noticed a start.sh file is used to override the start of the services. The reason for it is, until recently AWS Fargate did not support to export each individual secret JSON Key to the container.

I decided to leave it in here instead of using ComposeX to do this (which it can, see ComposeX secrets docs.) to show you how easy it is in a couple lines of bash script to export all these JSON keys at container run-time.

Typically, within your application you would import that secret and parse its JSON to get the values, however, Confluent Images were not built for it, and fortunately, we have environment variables to override settings.

For the control-center, this also allows us to define connect clusters and therefore here, to use the one we are deploying at the same time.

docker-compose files

So, we have a primary docker-compose.yml file which very easily allows us to define what is constant across deployments. Then we have an individual override file per environment. Here, just dev and stg (for staging), but then you could have 20 files if you wanted.

Now all we have to do, is deploy!

# Check the configuration is correct with the override files
ENV_NAME=dev ecs-composex config -f docker-compose.yml -f envs/${ENV_NAME}.yml
mkdir outputs
# Render the CFN templates if you want to double check the content.
ENV_NAME=dev AWS_PROFILE=myprofile ecs-composex render --format yaml -d outputs -n confluent-apps-${ENV_NAME} -f docker-compose.yml -f envs/${ENV_NAME}.yml
# Deploy, using up
ENV_NAME=dev AWS_PROFILE=myprofile ecs-composex up -n confluent-apps-${ENV_NAME} -f docker-compose.yml -f envs/${ENV_NAME}.yml

Here is an example of one of the envs files.

---
version: '3.8'
services:
  controlcenter:
    build:
      context: control-center
      dockerfile: Dockerfile
    deploy:
      resources:
        reservations:
          cpus: "1.0"
          memory: "2G"
    ports:
      - 8080:8080
    environment:
      CONTROL_CENTER_NAME: ${ENV_NAME:-dev}
      CONNECT_CLUSTERS: ${ENV_NAME:-dev}::http://connect.${ENV_NAME:-dev}.lan.internal:8083
      CONTROL_CENTER_KSQL_ENABLE: "false"
    depends_on:
      - connect

  connect:
    ports:
      - "8083:8083"
    deploy:
      replicas: 3
      resources:
        limits:
          cpus: "2.0"
          memory: "4G"
    x-scaling:
      TargetScaling:
        range: "1-3"
        memory_target: 75
    x-network:
      Ingress:
        Myself: True

secrets:
  CONNECT_CREDS:
    x-secrets:
        Name: /kafka/${CLUSTER_ID}/confluent.connect.cluster

  CC_CREDS:
    x-secrets:
      Name: /kafka/${CLUSTER_ID}/confluent.controlcenter


x-elbv2:
  controlcenter:
    Properties: {}
    MacroParameters:
      Ingress:
        ExtSources:
          - Ipv4: 0.0.0.0/0
            Name: ANY
            Description: "ANY"
    Listeners:
      - Port: 80
        Protocol: HTTP
        Targets:
          - name: controlcenter:controlcenter
    Services:
      - name: controlcenter:controlcenter
        port: 8080
        protocol: HTTP
        healthcheck: 8080:HTTP:4:2:15:5:/:200

x-vpc:
  Lookup:
    VpcId:
      Tags:
        - Name: demo
    PublicSubnets:
      Tags:
        - vpc::usage: public
    AppSubnets:
      Tags:
        - vpc::usage: "application"
    StorageSubnets:
      Tags:
        - vpc::usage: storage

x-cluster:
  Lookup: default-cluster

x-dns:
  PrivateNamespace:
    Name: ${ENV_NAME:-dev}.lan.internal

x-tags:
  costcentre: lambda-my-aws
  environment: ${ENV_NAME:-dev}

Conclusion

Whether you are planning on using Confluent Cloud clusters or AWS MSK, thanks to their open source nature, you can deploy Confluent components in your own AWS VPC and ECS Clusters, possibly in the future wrap them around with AppMesh if you needed, in only a few minutes, using AWS SecretsManager to store your credentials and deploy these components, scale them in/out using ECS ComposeX.

Hint

This was deployed and done with ECS ComposeX version 0.8.9 and happens to run in production today.

Distributed tracing with AWS X-Ray

New feature release: Enable AWS X-Ray for your containers

Hint

This is available since version 0.2.3

This post simply visits the new feature implemented in ECS ComposeX which allows you to turn on X-Ray for your container out of the box.

AWS X-Ray overview

AWS X-Ray is what's now one of my very favorite service on AWS. It integrates very well to pretty much any language and has some predefined integration with frameworks such as Flask.

In essence, X-Ray will capture the application metrics which will enable you to identify performances issues, and also provide you with an understanding of how your services communicate together.

It will also allow you to see how your application integrates to AWS Services.

The AWS X-Ray team also made available a Docker image that you can use in your local environments (laptops, Cloud9 etc.) and it will report metrics captured from your local environment, so it really is flexible to integrate anywhere.

How X-Ray is added to your ECS Task

Presently, when ECS ComposeX parses the configuration and services, it will for each service create a task definition which will contain a single container definition. Adding X-Ray was very straight forward, using the pre-defined Docker image provided by AWS, which also comes with recommened compute reservations.

When you enable X-Ray for your service in ECS ComposeX, it simply is going to add that extra container definition.

Secrets are kept secret

Because I care about security, and I am sure you do too, in the code is implemented to ensure that the X-Ray container will not be exposed with Secrets. For example, if you service was linked to a RDS DB, which would expose the secret as an environment variable to the container, the X-Ray container is specifically identified to not have access to that secret too.

IAM policy

The IAM policy that allows the X-Ray container / app to communicate with the X-Ray service is added to the IAM Task Role.

{
    "Version": "2012-10-17",
    "Statement": [
        {
            "Action": [
                "xray:PutTraceSegments",
                "xray:PutTelemetryRecords",
                "xray:GetSamplingRules",
                "xray:GetSamplingTargets",
                "xray:GetSamplingStatisticSummaries"
            ],
            "Resource": [
                "arn:${AWS::Partition}:xray:${AWS::Region}:${AWS::AccountId}:group/*",
                "arn:${AWS::Partition}:xray:${AWS::Region}:${AWS::AccountId}:sampling-rule/*"
            ],
            "Effect": "Allow"
        }
    ]
}

Enable X-Ray for your service

Enable or disable locally for a specific service

services:
  serviceA:
    image: link_to_image
    configs:
      x-ray:
        enabled: true

Enable for all services from the top level:

services:
  serviceA:
    image: link_to_image

configs:
  composex:
    x-ray:
      enabled: true

And yes, it is as simple as that.

What is next ?

Currently working on implement some more fundamentals features coming from the Docker compose definition and implementing helpers that will simplify Scaling defintions of the services.

Your feedback is most welcome and this project features will be prioritized based on what's needed from its users.

CICD Pipeline for multiple services on AWS ECS with ECS ComposeX

Introduction

A few days back, I published the first release of ECS ComposeX which allows developer teams working on AWS to deploy their microservices on ECS, using Fargate primarly to run these containers, and at the same time deploy the other resources they might need in order to run their microservices, such as AWS SQS queues, AWS RDS, AWS DynamoDB etc.

What this tool really aims to do is to merge the syntax of Docker Compose and AWS CFN into a common YAML Syntax, re-using the properties etc. of CFN but keeping it very light for developers, and provide all the application needs: IAM roles to communicate to AWS services, credentials to connect to the database, Service Discovery, etc.

And it is all good and well, but I thought it would be more relevant to show-case how to use that in the mix of a CICD pipeline.

So to do that, I am going to use very simple containers and applications which should be generic.

We are going to have:

  • Front End container running a Flask application
    • Receives the API calls

    • Sends a message in SQS

    • Gets the time from another application

  • Application to get the time
    • No load-balancer or else but registered in AWS CloudMap

    • FrontEnd app will get the time from there

For this we are going to use 1 SQS Queue for normal messaging, which is going to pass to DLQ. In a future blog post adding a new service, our worker will pull messages from the DLQ.

Note

I am afraid there won't be any screenshots to illustrate steps in this guide, but only command lines. The occasional screenshots will be to illustrate the different resources and results.

The CI/CD pipelines

Each of these two applications are going to use a generic CI pipeline, triggered in CodePipeline by a GIT activity. The build process will simply take the new code, run Docker build and upload the image into AWS ECR. As a last step once the image has been uploaded correctly into ECR, will pull out the latest Docker compose file and update the image property accordingly.

A separate CD Pipeline which listens on the change of the Docker compose file, will then kick off. In a CodeBuild step (could be in Lambda though), we are going to pull ECS ComposeX from Pypi, execute it against the Docker compose file and bundle the resulting template and parameters file.

These files will be then used by AWS CloudFormation to deploy a new stack (from scratch, with VPC etc.) to test the full deployment of all applications, with the new repository in place. Following that, we will run via CodeBuild a suite of tests against the endpoint (via the ALB) where the application stack has been deployed to ensure the functional behaviour of the apps.

The Pipeline will then continue into a manual approval notification to progress into deploying into an existing, pre-established environment. The only difference then, is that the VPC won't be changing. At that point, the name of the target stack is always the same and doesn't change.

CICD structure

The below image illustrates how the CI pipeline connects to the CD pipeline and via which artifacts. Obviously, in the CD pipeline, one would also execute the application integration test-suite against the deployed environment.

CICD Pipeline multi-accounts

IAM Structure

The below image tries to illustrate as simply as possible the different relationship between artifacts and IAM roles. It doesn't go to the tiniest of detail but gives a good overview, especially for the cross-account structure, of the different IAM roles and access between these.

Quick overview of IAM structure

Source code

All the ECS ComposeX Repository is available in GitHub, as well as the other applications.

Hint

To make automation easier and hide away the account IDs in this tutorial, not that I care too much about it, but still, they will be placed in a static SSM parameter. Feel free to create these for yourself to follow / copy-paste the command lines.

Applications & Repositories

First, I recommend to use the excellent local tools to run AWS CodeBuild etc locally. You can find the instructions to run codebuild-like executions on this AWS Blog page. For each of these applications, we will have a different GIT repository. For the purpose of this example, I am going to have these in CodeCommit, but demonstrate in alternative templates how you could use GitHub instead. I love CodeCommit because it is integrated to IAM so super easy to share across the members of groups and roles etc.

App01 - FlaskApp

This application is dumb and purely stateless. It is going to respond with the date when you ping it. As we are going to build new versions we will be able to add more build tests to it. App01 will also communicate with App02 by API message to get the time (fancy, I know!)

App02 - The date teller

The 2nd application will run without any load-balancer, but our App01 will communicate with it to get the date purely using Service Discovery.

The Docker compose repo

We are going to have a separate Docker compose repository which is here to be updated by CodeBuild whenever a build of App01 or App02 is successful and results into a new images in ECR.

Shared resources

We are going to have shared resources across our 3 accounts which at different points will be accessed by various other IAM entities, as the IAM Structure shows.

Tip

To help you with the walk through, you can use the templates for shared resources

ECR Repositories

The ECR repositories will be created with a policy allowing roles from the application/environment accounts (dev/stage/prod etc.) to pull the docker images from there. To create these, I am going to use CloudFormation and assign a resource policy to these. The template for these can be found on Github

We are going to create 2 in the shared/pipeline account.

for count in {01..02}; do aws cloudformation create-stack --stack-name ecr-repo-blog-app-${count} \
    --template-body file://ecr_repos.yml \
    --parameters ParameterKey=RepositoryName,ParameterValue=blog-app-${count};
done

KMS Key

The KMS Key is used to encrypt the artifacts in the Artifacts bucket via CodePipeline. This key allows basic use from the dev and the production account.

aws cloudformation create-stack --stack-name cicd-kms-key --template-body file://shared-kms-cmk.yml

Note

The Prod and Dev account IDs are sourced from SSM by default. You can comment the Parameters type and default for SSM and use the regular string and allowed pattern for AWS Account ID

Artifacts and templates bucket

The CI and CD pipelines are going to store artifacts. Artifacts used by CodePipeline to pass outputs from step to step, stage to stage, etc., and templates for Cloudformation.

So we are going to create the buckets first, without creating the IAM policies. Create the roles in your accounts and have their RoleId, we will update that stack with the RoleId for prod and dev roles which will create the bucket policy to allow these roles to access objects in the bucket.

I have not created the SSM parameters for these to show how to input all the parameters. Replace the values accordingly.

aws cloudformation create-stack --stack-name cicd-shared-buckets \
    --template-body file://shared-buckets.yml

Once you have the RoleId for the IAM roles, update the stack to create the Bucket policies.

aws cloudformation update-stack --stack-name cicd-shared-buckets \
    --template-body file://shared-buckets.yml
    --parameters \
        ParameterKey=ProdAccountCfnRoleId,ParameterValue=<ROLE_ID>      \
        ParameterKey=ProdAccountPipelineRoleId,ParameterValue=<ROLE_ID> \
        ParameterKey=DevAccountCfnRoleId,ParameterValue=<ROLE_ID>       \
        ParameterKey=DevAccountPipelineRoleId,ParameterValue=<ROLE_ID>

Cross-account roles

Cross account role

The cross account role allows the CodePipeline service to assume role into the destination account. Given iam:PassRole cannot be done cross account, this is how we get to run CloudFormation into the external account.

We want this role to be able to:

  • Decrypt objects with the KMS Key

  • Get objects from the artifacts bucket

  • Do everything for CloudFormation

  • Pass the CloudFormation role to CFN to create the stacks and resources.

CloudFormation role

As said above, iam:PassRole cannot pass role from one account to another. So once the assume role is done, we still want to pass role to not have this shared role which requires no MFA or external ID to have too many powers. Anyway, I generally prefer to give an IAM role to my CFN stacks anyway as soon as I delegate to a service to invoke CFN Create/Update/Delete.

Create the roles in your accounts

aws cloudformation --capabilities CAPABILITY_IAM                                \
    --stack-name cicd-iam-roles                                                 \
    --template-body file://crossaccount-roles.yml                               \
    --parameters                                                                \
        ParameterKey=CiAccountId,ParameterValue=<012345678912>                  \
        ParameterKey=CiKmsKeyId,ParameterValue=abcd1234-ab12-cd34-ef56-5678wxyz \
        ParameterKey=ArtifactsBucketName,ParameterValue=<BUCKET_NAME>           \
        ParameterKey=CloudformationTemplatesBucketName,ParameterValue=<BUCKET_NAME>

Orchestration

CI - Integration pipeline(s)

Now we have a clearer idea of what we need: we need a constant build project that is in charge of merging / updating the Docker compose file either when its own repository is updated, or, whenever a new image is successfully built.

So we are going to have two more CloudFormation templates for our CodePipelines and CodeBuild projects:

  • DockerCompose Build project, which does the same thing across all our applications: merge the docker compose files.

  • Applications codebuild to build the app, test it, build the docker image, test it, release it, and onto the Docker compose file merge and update.

Integration stages

  • Source from our Git repository

  • Run build tests and upload new image to ECR

  • Puts into artifacts the service, image SHA and other settings into a configuration file.

  • Pulls Docker composerx which merges the information from previous stage into the common docker compose file.

The application CI pipelines can be found here

To create the pipelines, I simply ran

for count in {01..02}; do aws cloudformation create-stack \
    --capabilities CAPABILITY_IAM \
    --template-body file://apps_pipeline.yml \
    --parameters file://app${count}-params.json \
    --stack-name app${count}-ci-pipeline;
done

Done that for all 2 applications. Obviously, we could have created the CodeBuild Projects just once and used it across multiple pipelines, but to keep things simple for this article, we get one build project per application. We would have to set variables overrides on the pipeline though.

Tip

In an environment with a lot of microservices, one might want to have a central build project for putting the Docker compose file together so that there is a natural queuing of changes happening in the repository for this.

Tip

Standardizing your application build and test framework (ie. use Pytest and tox for python, maven for Java) for all your services allows for you to have an unique buildspec.yml instead of having to customize each buildspec for each individual application build and test.

Note

We are using 2 (2 Apps * 2 Projects) to build our different artifacts. We could use only just two of them but then tasks would be queued. Also, note that having the build project but not using it to run build has no cost! You only pay for the build time :)

As you can see in the buildspec_composex.yml, we are pushing as CodeBuild user into the master branch. One might not want that but once again, for the purpose of demonstration, I am doing it that way. The great thing of using CodeBuild and Codecommit here is obviously that we gave specifically access to the CodeBuild role to push into that repository only.

{
"Version": "2012-10-17",
"Statement": [
    {
        "Action": [
            "codecommit:Git*"
        ],
        "Resource": "arn:aws:codecommit:eu-west-1:373709687836:myapps-compose",
        "Effect": "Allow",
        "Sid": "CodecommitAccessToDockerComposeRepo"
    },
    {
        "Action": [
            "codecommit:GitPull"
        ],
        "Resource": "arn:aws:codecommit:eu-west-1:373709687836:docker-composerx",
        "Effect": "Allow",
        "Sid": "CodecommitAccessToDockerComposerRepo"
    }
]}

With the AWS GIT Credentials helper enabled, here enabled in the env section of the buildspec.yml, it automatically allows IAM access to the repository.

So that is it for our Application build phase and Docker compose file update. Now onto the CD pipeline.

CD - Deployment pipeline

aws cloudformation create-stack --capabilities CAPABILITY_IAM \
    --stack-name myapps-cd-pipeline \
    --template-body file://cd_pipeline.yml \
    --parameters \
        ParameterKey=ComposeRepositoryName,ParameterValue=myapps-compose \
        ParameterKey=BranchName,ParameterValue=master \
        ParameterKey=ProdAccountPipelineRoleArn,ParameterValue=<ROLE_ARN>   \
        ParameterKey=ProdAccountCfnRoleArn,ParameterValue=<ROLE_ARN>    \
        ParameterKey=DevAccountCfnRoleArn,ParameterValue=<ROLE_ARN>     \
        ParameterKey=DevAccountPipelineRoleArn,ParameterValue=<ROLE_ARN>

Pipeline Source - Docker compose file

Our source trigger is going to be a change in the Docker compose file. For this, we could use multiple sources, for example: * AWS S3 : CodeBuild in our CI pipeline will store the artifact in S3 and we will use that as the source to run the build against * AWS CodeCommit: CodeBuild will update it from our CI stage. We have a repository setup for the Docker compose file specifically.

Whether the file is changed in S3 or in VCS, we might need to re-deploy / update our deployment / staging stack and onwards to production. There might not be application code changes, but we might have decided to change some settings which need to be reflected in our deployment.

Here, we are going to use CodeCommit as it is usually more consistent to use VCS as the source of truth, and allows a more consistent GitOps pipeline.

Templates generation stage

For this we are going to run CodeBuild again. We install ECS ComposeX and its dependencies, run it against our input docker compose file. This will generate our CFN templates and parameter files which are going to be used in the deploy phase.

First deployment - throw away environment

First off, we are going to deploy a complete new environment. This ensures the templates got created correctly, and our application containers can run properly. This is where onwards you might want to add a stage to perform integration testing against this environment.

Test phase

Our environment is ready and our applications are running. Especially in the case of public facing applications, with exposed interfaces to partners etc, this is where you take the testing up a notch with a fully fledged application testing against a running environment.

Using the outputs of the CloudFormation stack, we can identify our endpoints, and run tests against these.

Cleanup phase

Assuming that all went well with the testing, we are going to get CodePipeline to delete the stack. If the execution was failed for the testing, then everything is still running and you can look into the logs to figure out what's happening.

Deployment to production

Note

Before deploying into production, I created a VPC using ecs-composex-vpc. Production environments are usually built in different phases as opposed to all in one. Using the outputs values, I created the CFN Template configuration file

Of course, in many cases there are plenty of environments between dev and prod (UAT, SIT etc.). These environments often will have been created, and the values of interest (VPC ID, Subnets ID etc.) will be passed in as parameters.

To do that, we would pass a CloudFormation stack parameters file into CodePipeline, with the values of our VPC.

Given ECS ComposeX can skip the VPC and ECS Cluster creation part, it is very easy to simply pass these arguments to the root stack which will simply use the values and pass them on, dealing only with the X-resources and ECS services.

Before going to production, a lot of people want to have a manual approval. Often this takes days in large companies.

Conclusion

With a very simple pipeline taking care of the CI for our application and its packaging into ECR, with the help of a central repository for your application docker compose file and using ECS ComposeX, we were capable to deploy a brand new environment, from scratch, to deploy our application into and that we can use to run any automated tests planned for.

Using CodePipeline as the central orchestrator to deploy our stack into multiple accounts, we can very easily replicate these steps to multiple environments, across multiple accounts, and yet have very little to do.

Note

Not all of the applications might not have been completely finished at the time of writing this blog post. I wanted to focus as much as possible on the CICD part of things as opposed to the applications deployed themselves. It leaves room for a part 2 of this post.

Alternative pipelines

It is completely up to you and your business to decide how you are going to release your applications and therefore decide on what is going to trigger your deployments. Here in this example, I am considering any push on the master branch of my compose repository. You could have with your GIT strategy decided that only a new tag release can trigger a deployment to production and that other pushes, such as new branches etc. would trigger dev environments deployments / updates only.

Room for improvement

As for everything, there is always room for improvement. Please leave your comments and feel free to submit issues or even PRs against ECS ComposeX or this blog's repository for patches and improvements.

Because pipelines and the associated resources are not the most friendly things to generate, I will start working on a similar project than ECS ComposeX which for now is called Pipeline composer, pending a better name possibly.